Mail relay med Office 365 14.07.2022 13:03 karlsen
Obtain the public (static) IP address that the device or application with send from. A dynamic IP address isn't supported or allowed. You can share your static IP address with other devices and users, but don't share the IP address with anyone outside of your company. Make a note of this IP address for later.
Sign in to the Microsoft 365 admin center.
Go to Settings > Domains, select your domain (for example, contoso.com), and find the MX record.
The MX record will have a Points to address or value value that looks similar to contoso-com.mail.protection.outlook.com.
Make a note of the MX record Points to address or value value, which we refer to as your MX endpoint.

Check that the domains that the application or device will send to have been verified. If the domain is not verified, emails could be lost, and you won't be able to track them with the Exchange Online message trace tool.
In Microsoft 365 or Office 365, select Admin and then Exchange to go to the Exchange admin center.
In the Exchange admin center, go to Mail flow > Connectors.
Check the list of connectors set up for your organization. If there is no connector listed from your organization's email server to Microsoft 365 or Office 365, create one:
a. To start the wizard, click the plus symbol +.
b. On the first screen, choose the options that are depicted in the following screenshot:
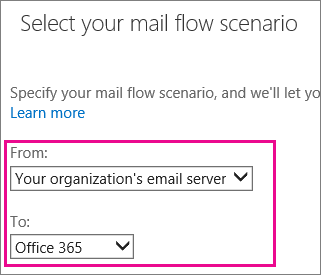
c. Click Next, and give the connector a name.
d. On the next screen, choose the option By verifying that the IP address of the sending server matches one of these IP addresses that belong to your organization, and add the IP address from step 1.
e. Leave all the other fields with their default values, and select Save.
Now that you are done with configuring your Microsoft 365 or Office 365 settings, go to your domain registrar's website to update your DNS records. Edit your SPF record. Include the IP address that you noted in step 1. The finished string should look similar to this v=spf1 ip4:10.5.3.2 include:spf.protection.outlook.com ~all, where 10.5.3.2 is your public IP address. Skipping this step can cause email to be sent to recipients' junk mail folders.
Now, go back to the device, and in the settings, find the entry for Server or Smart Host, and enter the MX record POINTS TO ADDRESS value that you recorded in step 3.
To test the configuration, send a test email from your device or application, and confirm that it was received by the recipient.